Wednesday, March 9, 2011

Reusable Shopping Bags

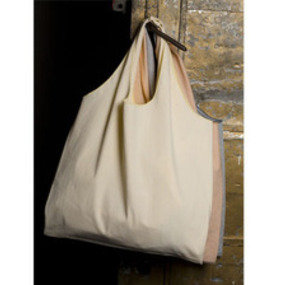
These bags were made from Burda Style Charlie Bag pattern which can be found here for free. 
I love free patterns almost as much as I like
"keeping it Green"
Of course I've made some modifications to the pattern, like the box bottom.   For the box bottom, I just cut out a 2 1/2" square from each corner, pin together, matching side and bottom seams, lay flat and sew across the diagonal and you get a box.  I find this method to be the easiest and most accurate.  Lined bags are fun because they add a contrasting fabric to make them look more stylish and it makes them stronger.

Wednesday, March 2, 2011

Charlie Reusable Grocery Bag

Going to make some of these "Charlie Reusable Grocery Bags" today. I try to use reusable bags as much as possible, but the ones I use for grocery shopping are too big to take along everywhere. These bags are meant to be folded up very small and fit in your purse. You can download this pattern for FREE at BurdaStyle.

BurdaStyle-Charlie Reusable Grocery Bag

250x225_large_large

Thursday, February 24, 2011

Upcycling: Poperover-with-a-Twist
Featured on:
 Bernina USA Sewing Trends Blog
February 24, 2011

Monday, February 21, 2011

Rag Quilt with Chenille and Reverse Appliqued Stars

I made this quilt for my husband. It is made with Alternating Faux Chenille and Reverse Applique Stars. Each block is a finished 9 inch square and the quilt is 63″ × 81″; extra long for my tall husband. Each block consists of 4 layers of flannel, I’ve come up with my own method using freezer paper. First, I cut the freezer paper to 10 inches square, then I draw my stitching line 1/2 inch from the edge.

For the Stars: I drew an asymmetrical star in the center. Next, iron the freezer paper to the top layer of flannel, add 3 more layers to the bottom and pin the outside edges and one pin in center. With paper side up, sew the outside square at seem allowance and then sew the star on the drawn line. I used a 1.5 (very small) stitch legnth, so that the freezer paper could easily be torn off without pulling the stitches and breaking them. Carefully pull the layers of the star apart and only cut through the top two layers of flannel, trimming the reverse applique a 1/2 inch from the sewn line clip every 1/2 inch.

For the Faux Chenille: I also used the freezer paper and drew 45 degree, diagonal lines every 1/2 inch, starting at the center, and working out. Draw the 1/2 inch seam allowance also. I have found that the freezer paper stabilizes these chenille blocks very well, and you end up with a “square” block instead of a distorted one from sewing across the bias. Iron the freezer paper to the top layer and then stack the other three layers and pin. The way that I sewed these was to start sewing up the shortest line (in one corner), up to the seam allowance line, across that line, and back down to the the next line, sewing in a continuous line, zig zagging to the other corner, until all the lines are sewn. Do not sew the entire seam allowance line first as in the star block, you will need to cut up the channels to make the chenille. Cut the chenille channels before sewing quilt together.

Next sew all the blocks together as you would any other quilt, except the raw edges go on the top of the quilt. Clip all raw edges every 1/2 inch to make the rag part of quilt. I clip the raw edges about 3/8" deep, as not to cut past the seams.
Last step is to wash and dry it, so it fluffs up and turns to chenille. BE VERY CAREFUL WASHING, CHANGING LINT FILTER FREQUENTLY. I have found that it is best to use a very short rince and spin cycle, and empty dryer lint every couple of minutes.
Imag0265_large
  • Imag0265_grid
  • Imag0266_grid
  • Imag0267_grid
  • Imag0268_grid
  • Imag0269_grid
  • Imag0270_grid
  • Imag0271_grid
  • Imag0272_grid

Tuesday, February 8, 2011

Popover with a Twist – Sewing Projects | BurdaStyle.com

Popover with a Twist – Sewing Projects BurdaStyle.com

This dress was made for my niece Blair. It is based on Oliverands’ Popover Sundress. Thank you for a great Pattern! Since Blair is a size 10, I made some alterations to the pattern and changed it up a bit. I like to put my “twist” on what I sew to make it my own. I made the yoke a little taller, added straps (instead of ties), added more fabric at center front and back (so that I could gather front and back for more fullness). I also wanted the back to be more of a “racer” back, so I made the yoke a little narrower. On the back of the dress, I added a large fabric flower, which is attachd to a loop with a hair clip. I decided to do this so that it is removable, and there’s the added bonus of wearing it as a hair piece. Since I like to upcycle, I also made a pair of capris with ruffles and a matching D-ring belt. Paired with a simple tshirt, this outfit will take her from early spring to the hottest summer day.
Imag0226_large
 
  • Imag0218_grid

  • Imag0219_grid

  • Imag0221_grid

  • Imag0223_grid

  • Imag0220_grid

  • Imag0225_grid

  • Imag0224_grid

  • Imag0222_grid

  • Saturday, January 22, 2011

    Upcycled Jean Skirt for Blair

    Imag0173_large

    Description

    I love upcycling! I’m saving the earth one recycled item at a time. I used an old pair of jeans that became to short for my niece, and recreated it into a very full skirt. My specialty is creating custom/unique items. Blair’s instructions were that she wanted a “Buzzing Bee”, so I searched through my library of embroidery designs and found a buzzing bee. It was originally a black eyed susan, but I changed it to a daisy by simply changing the colors to a pallet that mached the print on the fabric that I chose. I opened the crotch seams of the jeans and sewed them flat. Next I did the embroidery. After that, I cut off the the excess Jean legs. I added two coordinating fabrics to make the very full skirt. I like to add a D-ring belt with the same fabric as the skirt. I think it makes it all come together nicely.